
The Lone Ranger – Bed Bob
Guest post by Rob
He wanted 14-1/2″ bob’ed…

Worked out well that the outside was 1″ back (this kept the seam rigid)..

And the inside was 2″ back.. this aligns with the double seam under the bed for strength…

Just used a 4″ grinder with a cut off wheel. Use PPE and take your time. it can be very straight…

14-1/2″ later… at the bottom LEAVE some steel because the flair at the front is not as large as at the wheel well…

Remember the inside is 1″ ‘shorter’ than the outside. You have to trim the rail where the inside meets the top rail on the outside of the bed…

If there was any part of this that sucked… it was matching up the seams… Grind, fit, grind, fit, cuss, grind, fit, cuss, repeat..

You don’t need to leave this much steel at the bottom, but with any bodywork, always leave more than you need so you can trim and fit…

Let the fun begin… spot welds. Lots and lots and lots of spot welds. Keep heat LOW… I found that using a wire feed about 1-1/2 times higher than normal for a completely closed gap and up to 3 times more for filling gaps worked well for my Lincoln Powerpac 100… Start the arc off the side, and then rapidly wiggle it back and forth keeps from vaporizing the thin sheetmetal… Move 6″ away and start again. Once you have a good bead, strike the arc on that and fill the gaps… Do nothing more than a spot weld or the thin metal just goes away…

Oh…Wrapped towels on the end of the bed so I could stand it upright.. spatter and dry towels while spot welding kinda SUCK… 😉

Here’s why you leave extra metal on the bed side.. basically cut the cap and expand it… used wire to fill the gaps…

[Tommy Boy] Fat guy in a little bed… Fat guy in a little bed… [/TommyBoy]

Was able to overlap the inside of the bed. Not worried about strength at all… Around the mounting holes, just cut and weld up corrugation…

On the driver side you have to deal with the gas tank relief.. and on the side, there’s about 1″ difference in the radius at this cut because of the relief for laying 2×4’s in the bed. I spent tons of time with a hammer and dolly.. then just said eff it, and beat the snot out of it until it aligned up…Anytime you do this much welding, panels will warp.. get your hammer and dolly and straighten back out…

Protect seams (roofing patch)…Now comes the fun.. Bondo on. Bondo off. Bondo on. Bondo off. Two skools… you can’t have any more than 1/4″ depth… so glob on snot loads…

or smaller layers…

Been 30 years since I’ve done bodywork. Snot loads was much easier as you just sand 95% off and you’re done. Thinner layers means you do about ½ dozen and is much more work… For the filler.. made a mask 8″x9″ and notched it so I could center up on both the bed and the filler door. Made Ben mark the spot for it…
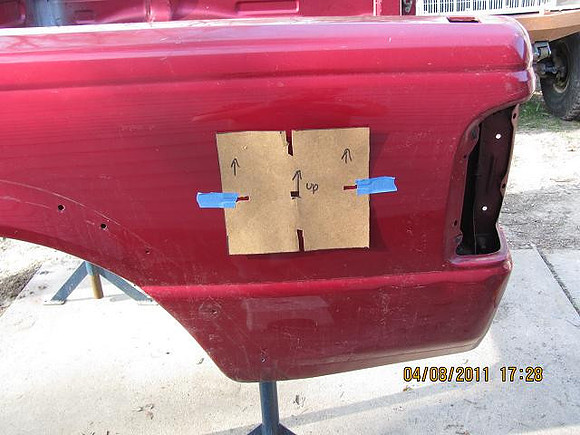
Make a big hole…

Anytime you do this much welding on a flat panel, it’s gonna warp like a booger… Unfortunately, you can’t really get behind it to do hammer and dolly work. This will be “ok” but a 10 footer (look OK from 10 foot but not necessarily closer)…

Mean time… Primer on. Primer off. Primer on. Primer off…

Brings us to today… Bought real paint to shoot on this and it’s best if it’s 70F or better. We’ve had awesome weather until today. Cold front is in and it’ll be a week before it warms back up… So it’s back to Bens place for fitting (keep your greasy mitts off of it! ) and then we’ll shoot paint…

